Understanding well what a client has in mind for his/her mobile app can be a slippery process. As a designer, you surely want to deliver to the best of your abilities and make the client happy. But when it comes to ensuring the success of a mobile app design project (or any other design project to that matter) just having good design skills is not sufficient.
Good and clear communication with your client about his/her expectations consistently throughout the project is what will either make your relationship bloom or decay. So we’d better equip ourselves with the necessarily tools and strategies that will help us prevent the miscommunications and ensure the success of our design projects, isn’t it?
One of the helpful tools to have in your designer’s toolkit is a design brief which sets a solid foundation for your project and puts it on a good start. It takes a bit of time to prepare but, considering all the trouble it helps to avoid down the line, it is really worth your time! On top of that, it helps to clarify all the project’s ambiguities that could have been missed if not given a proper attention. It also reassures your client that you know what you are doing.
A design brief is not a document that, once done, should be dusting in your folder. Just like the project itself, it can change along the way. Treat it like a tool that you can always resort to whenever certain requirements need to be clarified and validated. Before or during the project.
So without further ado, let’s look into what a good design brief for a mobile app should do. This checklist has helped us to work better with our clients. We hope it will give you some ideas which you could apply in your own work.
1. Define what a mobile app is, does, and why it exists
A good design brief for a mobile app should clearly define what this mobile app is, does and why it exists. Get to know the company and the mobile product you are about to design a little better. Why does the client want to launch this product? Where did the idea originate from? What is this mobile app all about? What does it enable people to do?
Ask your client whether or not the competition should be taken into account. If so, familiarize with their key points of difference. This way you will be able to highlight them through the design and make the app stand out.
2. Define the end user & the context of use
When designing a product – be it mobile, web or analog – the end user is always at the core focus and is the main factor behind every choice. The key things you and your client should consider defining about the end users of the app are the following:
- Profession
- Age
- Comfort level with technology
- Needs
- Current frustrations & pain points
- Context of use
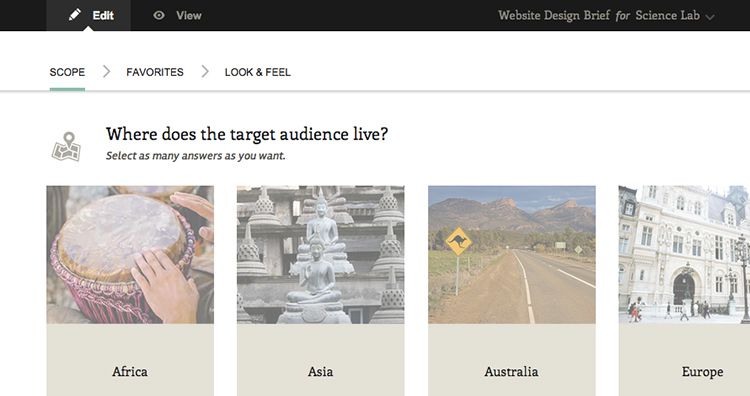
My Visual Brief helps you to define your target audience quickly and visually.
The latter, context of use, is an important element to dive into deeper. Designing a data entry app that will be used by a nurse at a busy hospital is different from creating an app for someone working in a quieter office. Different contexts of different users require different strategies for the design. The more you know about them, the more informed you will be about making certain design decisions and setting an overall design direction for the mobile app.
3. Define the platform & the app’s functionalities
Once the context of a mobile app has been defined and it is clear who will be using it, the next important step is to define the app’s platform most frequently used by the future users (OS or Android). Then, based on the selected operating system, one should define the functionalities that the mobile app should have. What does the mobile app have to offer?
As you might know, mobile apps are divided in two different types: 1) content driven or 2) task driven. This will define the “weight” of the design. Content driven apps, like magazines or catalogs, have limited functionality and are more visual. Task driven apps demand more functionality. In these cases, the visuals should be on the backburner and not imposing, in order to keep the app functional for the user. The busier the visual design gets, the less functional it will be.
If the mobile app is task oriented it is very important to clearly state in the design brief what are the basic functionalities, what will the app solve, how many tasks it enables the user to accomplish, and so on. Work with the client to include all known details of the functionalities. Try to drill as deep as possible into defining what those functionalities should do.
When the functionality list is clear, prioritize it. What will be developed now and what will be left for later? This will help you to keep the big vision in mind.
4. Define the "vibe" of the experience
Is it going to be fun? Efficient? Explorative? Discovery-based? A mixture of a few? Does the client already have in mind other mobile apps which experience s/he likes? Explore and discuss this together until you can clearly define the vibe that the mobile app should project and the type of experience it should provide.

Peek calendar is dynamic and fun to use.
For now, this should be just on the high-level. You’ll get into the details during the actual design process itself. Just set the stage for now.
5. Define the content
Once the "backbone" of the mobile app has been put in place, it is time to clarify the app’s content. Will it have audio, video, image and/or documents? How will the content be sourced? Will it be purchased online? Crowdsourced? Written by a copywriter? How does this influence your design process?

6. Define the look (the fun part!)
Most of the time, the look and feel of a mobile app is an important part of the overall experience it provides. When it comes to discussing the app’s visual style with your client, use images instead of relying on words. Words by nature are subjective and often lead to lots of miscommunication.
The most effective way is to ask your client to send you three or more examples of mobile apps s/he likes and dislikes and clearly pin-point that. It will help! Here is one example below:
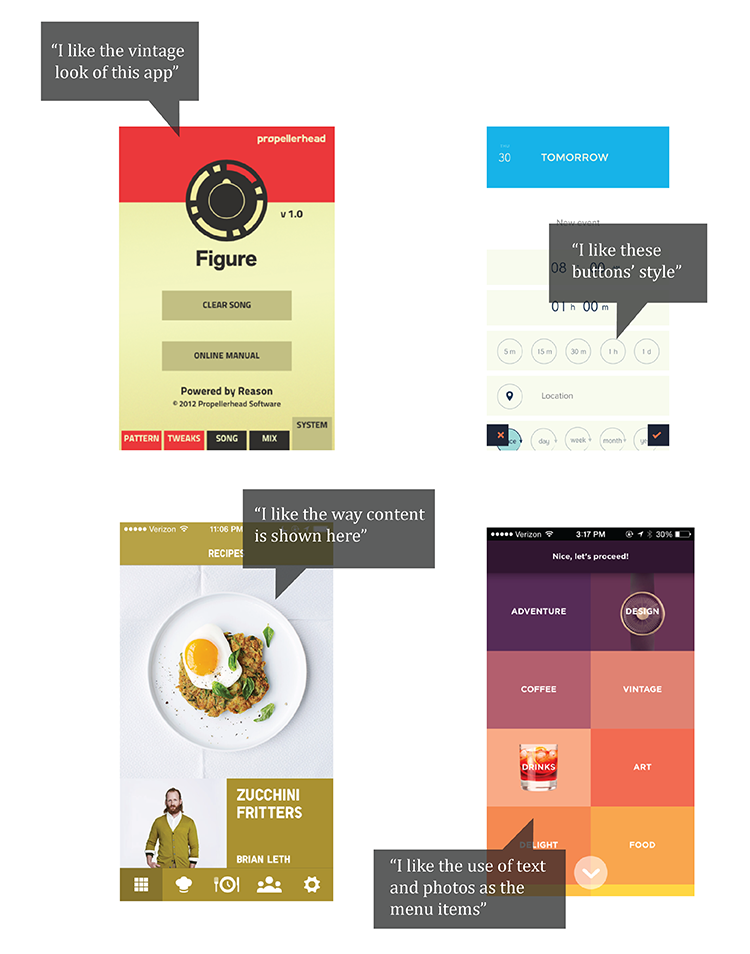
My Visual Brief enables your client to discover different mobile apps, comment on them easily and share it with you.
Remember to stay objective during this step. The app needs to appeal first and foremost to its audience rather than be designed according to your or your client’s personal tastes.
7. Specify the nitty-gritty
The devil is in the details so clarify the nitty-gritty. Image modified from John Penton.
Once the big picture is clear, it is time to specify the nitty-gritty. How many screens will you need to design? Will you need to design the icons or is the client ok to purchase them online? What are the design standards you have to adhere to based on the operating system you’ll design for (iOS or Android)? Which resolutions do you need to deliver the designs in?
8. Set the budget & timeframe
And now the logistics: the budget and the timeframe. Often these two are specified in the estimates or quotes. But for the design brief to be complete, it is good to include them here as well. What, how much for and when all go together :)

Creating a design brief is a very specific task and best to be kept as a two way street between you and your client. While working collaboratively together you are both shaping the project for its very best. It’s an important step in the design process. Make sure to guide the client in keeping a balance between his/her business needs and those of the audience. Often the clients forget that :)
Conclusion
I hope these tips will help you to create a good design brief and ensure the success of your mobile design project. Again, treat a design brief like a tool that you can always resort to whenever certain requirements need to be clarified and validated. Don’t let it dusting in your folder and letting you have all that miscommunication trouble… If you’d like to explore an efficient and collaborative way to create a design brief online, I invite you to check out My Visual Brief.
Good luck!
Related Topics
Top