As a web designer, from time to time, you may need to make a grayscale image fade into color on mouseover. So the typical solution would be to have each image desaturated to achieve the grayscale effect in Photoshop.
Then, you would have to add a few extra divs and image tags to the markup an then add some jQuery magic to fade the images in and out.
Or, you could have merged two images into one larger image with double the height and play around with background positioning in the CSS and Javascript files.
Lets have a look at the pros and cons of each of those two solutions:
Pros:
- If you use an image sprite (both images in one file) then you have one less HTTP request for each image.
Cons:
- You have to manipulate each image separately, which means that the client might not be able to update images with that effect dynamically and it is a time consuming proccess.
- If you use two images then you will have many HTTP requests. Either way, if the images are large the site becomes significantly slow.
- You need to write the jQuery code for the hover and fade effects.
Having to do that every time really bumped me out, so I searched for a method to do this dynamically for each image, without the need of losing semantic markup and having to process each image.
Enter the canvas element. With the introduction of HTML5, the canvas element became more and more prominent in the community. The most of you will have already heard of what the canvas does, so I’ll not get into it here. What I needed from canvas, was its image manipulation capabilities. You can import an image inside your canvas and manipulate the value of each pixel.
That was pretty much what I needed to develop my Hoverizr Plugin. A jQuery plugin that dynamically adds an effect (grayscale, blur or color inversion) to the targeted images and includes a fade out/in effect on mouse hover. And, following the web design trends, it is fully responsive.
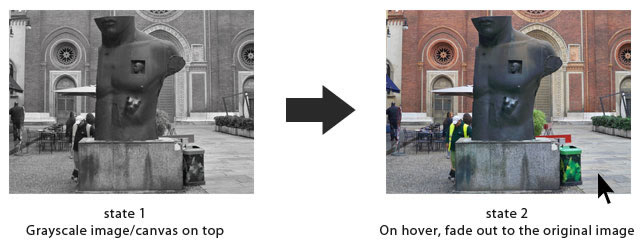
This is what we will achieve with a nice fade out of the manipulated version on the top:
You can view a live example together with demos of the other effects of Hoverizr here.
Now let’s dive in.
Hoverizr
Hoverizr is separated in three parts.
- Initialize and create needed elements.
- Create the canvas element and add the effect.
- Add the hover fade in/out effect for the targeted image elements.
Hoverizr takes simple markup like this…
<img class="classname" src="image-file" />…and outputs something like this…
<div class="hoverizr-container">
    <img class="classname" src="image-file" />
    <canvas class=".canv"></canvas>
</div>
Part 1. Initialize and Create Required Elements
To achieve this markup and add essential styling on the canvas, image and div container, I used the jQuery below inside an .each() function to affect all the targeted images:
$(this).wrap('<div class="hoverizr-container" />');
$(this).parent(‘.hoverizr-container’).css({'position':'relative'});
$(this).parent(‘.hoverizr-container’).append('<canvas class="canv"></canvas>');
$(this).next('.canv').css({'position':'absolute','top':'0','left':'0','z-index':10});
$(this) refers to each of the images targeted with our code in the initialization. We create a div that wraps the target image element, we set its position to relative to have the image and the canvas on top of each other. Then we create the canvas element underneath the image element and finally added some styling to position the canvas exactly on top of the image.
Of course, in the plugin’s code some parts are different.
Part 2. Create the canvas Element and add the Effect
On to the second part, where we will initialize the canvas and action the image manipulation. For the purposes of this tutorial I will only explain the grayscale effect.
Firstly, we get the width and the height on two variables to use them on the canvas initialization. Again, $(this) refers to each of the images the plugin targets.
var width = $(this).width();
var height = $(this).height();
Lets create our canvas:
$(this).next('.canv').attr({"width": width ,"height": height});
var canvas = $(this).next('.canv').get(0);
var context = canvas.getContext("2d");
var image = $(this).get(0);
context.drawImage(image, 0, 0);
So we set the width and the height of the canvas, we get the element to the variable, get the context and finally add our image inside the context.
Now for the image manipulation magic!
try {
      try {
    var imgd = context.getImageData(0, 0, width, height)
      } catch (e) {
netscape.security.PrivilegeManager.enablePrivilege("UniversalBrowserRead");
    var imgd = context.getImageData(0, 0, width, height)
      }
} catch (e) {
throw new Error("unable to access image data: " + e)
}

var pix = imgd.data;
This whole try and catch part is to enable privileges to some browsers that have extra security measures (nothing critical of course). We have a new imgd variable to store the image data which we then save inside the pix variable as an array.
Now the grayscale effect:
for (var i = 0, n = pix.length; i < n; i += 4) {
    var grayscale = pix[i  ] * .3 + pix[i+1] * .59 + pix[i+2] * .11;
    pix[i  ] = grayscale;   // red
    pix[i+1] = grayscale;   // green
    pix[i+2] = grayscale;   // blue
    // i+3 is alpha (the fourth element)
}
context.putImageData(imgd, 0, 0);
We have a repeating pattern here. Each four values of the pix array represent a red, green, blue and alpha value of a pixel. Obviously we don’t want to change the alpha so we’ll leave it out. Instead of just getting the average value of the three color channels, I am instead using a nice formula I got from a nice tutorial, HTML5 Canvas Image Effects: Black & White. Finally we put the new image data back on our canvas.
Part 3. Add the Hover fade in/out Effect for the Targeted Image Elements
This is the final and probably the easiest part. Making the canvas fade out to reveal the original image beneath when the mouse hovers over.
this.parent('.hoverizr-container').hover(function() {
    $(this).children('.canv').stop(true,true).fadeOut("fast");
    },function() {
    $(this).children('.canv').stop(true,true).fadeIn("slow");
});
Again this stands for the target image element. The hover function is pretty much self-explanatory. All we do is target the canvas, stop any queued animations and it out. Speed is set to “fast” but it can be set to “slow” or a numbered value in milliseconds. When the hover is finished the second function takes place, fading the canvas in again.
Known Issue
A security measure of the browsers might come up if you try to use images from another domain. Unfortunately, there is nothing we can do at the moment. The images need to be hosted on the same domain as your page.
Hoverizr vs. this Tutorial
Hoverizr is a plugin that has already everything you need to achieve this effect together with blur and color inversion effects. It has a lot of customization options included like width and height setup, speed of the fade in and out setup and many others. The purpose of this tutorial was just to show how some of the nicer parts of Hoverizr work. The code will not work as is as it is part of the plugin -stripped to basics -.
If you are interested in using Hoverizr, improving it or giving me any suggestions feel free to check it out here: Hoverizr jQuery Plugin.
Related Topics
Top