If you can create a user login form for your product or app in minutes – and without coding – you must be doing something illegal or magical. Or, you could be using Mason, a feature-building platform designed for teams to work together to design, build, and deploy front-end features.
Let us first explain what Mason is. Then, we’ll show you how easy it is to build, design, and deploy a login form in mere minutes.
Mason is a front-end-as-a-service platform on which you can design, build, and deploy fully-functional features for software applications. You’re given total control in managing your front-end experiences in your codebase, making it possible to create a live feature in minutes.
Mason effectively eliminates the need to provide documentation for development and having to wait for the next deployment cycle; thereby eliminating weeks if not months from your work schedule. You’ll consolidate prototyping, QA, and engineering down to move at lightning speed.
Here’s how you use Mason:
- Pick a component or components from the platform that you will use to design the feature you wish to create; in this case either a single user login or a login flow with its various commands and options.
- Pick a template to work from or build your own. Either way, you can customize it down to the final pixel.
- Snag a developer for a few minutes, have them help you connect your API endpoints, hit “Publish” and your newly created feature is live in seconds. Now, you can export your feature and with a single line of code, drop it into your codebase.
How to Create a Login Form Without Writing Code
As you’ll see from the video tutorial, it’s not at all difficult. All you have to do is hit Play, sit back, and prepare to be impressed with how easy it can be.
If you’d like to go through the instructions one more time to make sure you have them right, we’ll repeat them for your benefit.
You’ll be using Mason Canvas and Mason Builder to create the user login form.
Mason Canvas is a virtual whiteboard on which you visually create your front-end design. No coding is involved, and you won’t have to hand your design over to a development team.
Mason Builder enables you to create and customize features for a website or app and connect them to the already existing backend.

It’s important to note that whenever you make a change to a feature, it automatically translates into valid HTML/CSS; code that doesn’t require debugging that could slow the deployment cycle.
With these tools in hand, you’re ready to proceed by following these step-by-step instructions:
Step 1. Shape Your Login Form
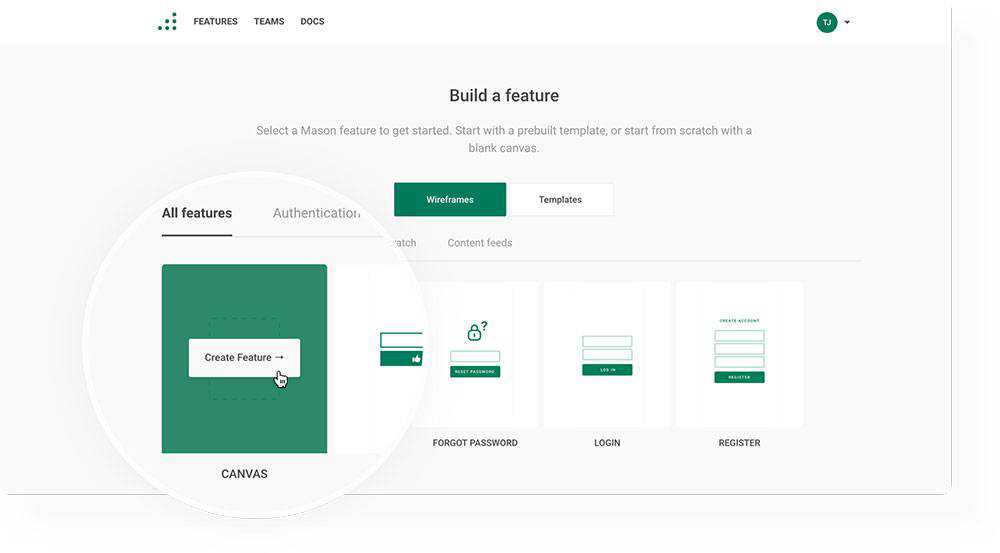
When you log in to your Mason account you’ll see a “+New Feature” button. Clicking on it will present a variety of options. Click on the “Canvas” option.
+New Feature → Canvas
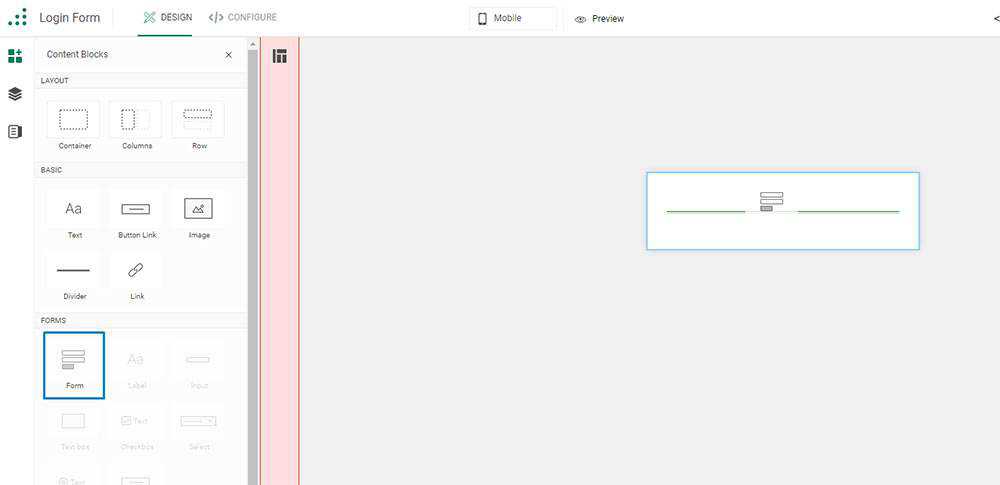
Next, click on the “Elements” tab (on your left), and go to the “Forms” section. Select a form and drag and drop it into the Container which already resides on the Canvas.
Elements → Forms → drag-and-drop form from Canvas
Click on the white space around the form to select the Container. Upon doing so, you’ll see a bar to your right. Important: Check the bar to ensure the height is set at 100% before proceeding.
You now have only 3 clicks to go to shape your login form! Well done!
Select the “Data” input form inside your form and click on the “Clone” tab at the top in order to add as many input fields as you’ll need. You’ll then want to toggle to the “Attributes” tab on the bar on your right to select the type of input you need for each field – text, number, URL, etc.
Data → Clone → add input fields
Data → Attributes → select type of input for each input field

Step 2: Customizing Your Form
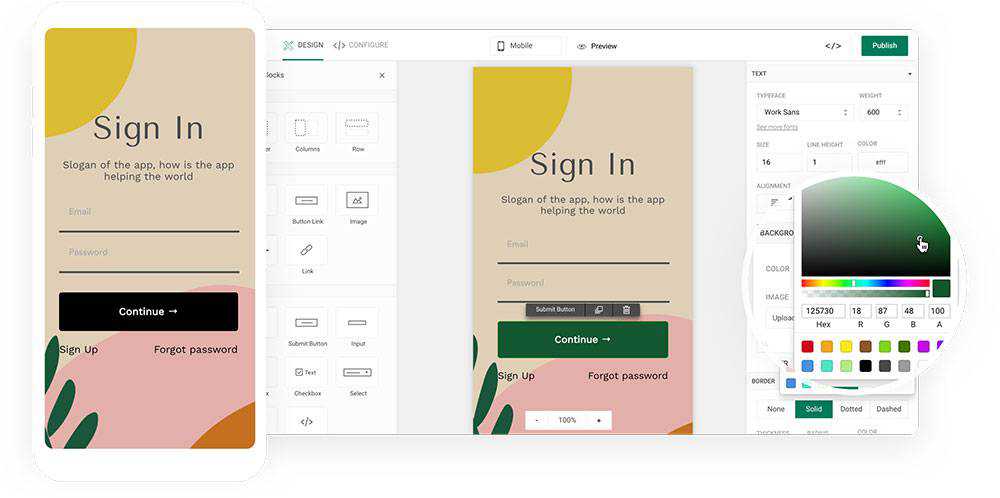
Customizing a form using Mason is essentially a no-brainer. Select your form one more time and look for the “Styling” sidebar. “Styling” lets you style your form any way you want including changing colored editing borders, changing size or background, and more.
Once achieving the style you want, move to the “Submit” button, which by the way, you can also customize.
All that’s left is to hit “Publish”.
Don’t forget to hit “Save” periodically as well to save your work!
Step 3: It’s Time to Make Your Form Fully Functional
To make your form fully functional you need to go to Configure and select “Datasources”. This is where you fill in your API Endpoint. A developer on your team can help you with this in just a couple minutes if you’re not a technical product user.
In the event you’re not sure what an API Endpoint is, its an address (URL) that enables users to access your application (in this case, log in).
Datasources → fill in API Endpoint
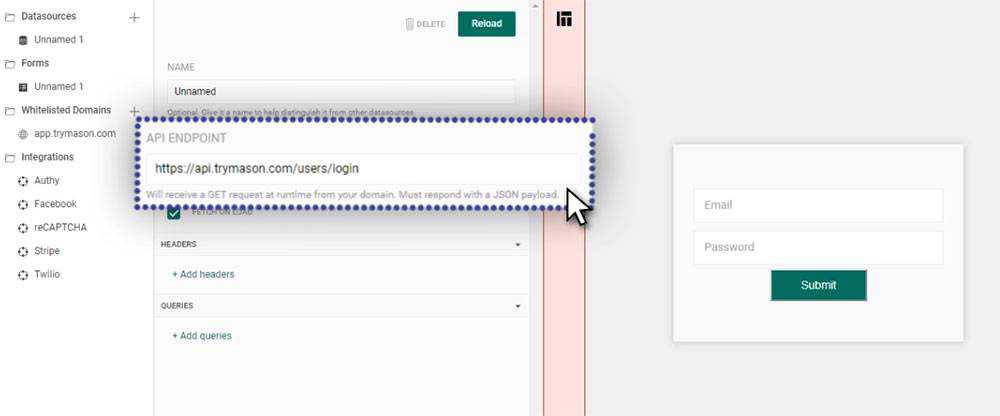
Next Step: Go back to the “Forms” section and select “Post” as your submission method. All that’s left is to hit “Publish” and click on the “Preview” button to verify that everything is in order.
Forms section → Post → Publish → Preview
Step 4: Testing the Login Form
Since you followed these instructions, you can be confident that everything works, but it never hurts to check. You can do so by checking the network request with a Chrome’s developer tool.
Simply go to “Inspect – Network” where you can see requests the browser is making. By filling in a few test credentials you can verify that your form is working as planned.
Other Cool Things Mason can Do and Why You Should Try It
Where designing and building functional pieces for a UI can easily take weeks or even months, you can achieve the same result in minutes with Mason and test your creations in seconds – saving time, money, and resources in the process.
And, you receive these extra benefits as well:
- Lightning-fast turnarounds in delivering functional solutions will amaze your clients by far exceeding their expectations.
- You won’t be stuck on a single project for weeks. Instead, you can take on extra work and make room for new clients.
- The features you create will be consistent with brand style guides. If something changes, like a color or font, just change it inside Mason, hit Publish, and your changes will be pushed live to your already-functional front end feature.
Mason is team-oriented. By doing all the work on the front-end, your team members feel empowered, and collaboration between team members, clients, and other project stakeholders becomes second nature.
Best of all, downtime and deployment cycles you once had to endure can become history since any authorized individual can log in, make a change, and make the updated feature live.
Increase your team’s productivity by at least a factor of 10-Mason is open and ready for you, and it’s free to start, so click here to give it a go!
Top