The newest version of Xcode comes packaged with a few noticeable interface changes. For beginners and intermediate users it can be difficult figuring out even the most basic functionality. And although Apple’s online documentation is well-written, it’s certainly not friendly for the average user.
So in this guide I’d like to put together some basic steps for building any iOS app. I’ll be focusing exclusively on iPhone & iPod Touch devices since iPad opens up a whole new chapter of research. You aren’t required to understand Objective-C or MVC programming to get started with this Xcode guide. But any dedicated iOS app developer will study at least some basic syntax guidelines.
I should point out that Xcode can only be installed on a Mac laptop or desktop running OS X. Unfortunately Windows and Linux users are unable to install the software, and the app source code will not compile properly. Otherwise you can download Xcode for free on Apple’s website or from the Mac App Store.
Creating a New Project
When first running Xcode you’ll be given a startup window with the text “Welcome to Xcode”. From here you can open recent projects or even create a new one. The first link Create a new Xcode project is what we want.

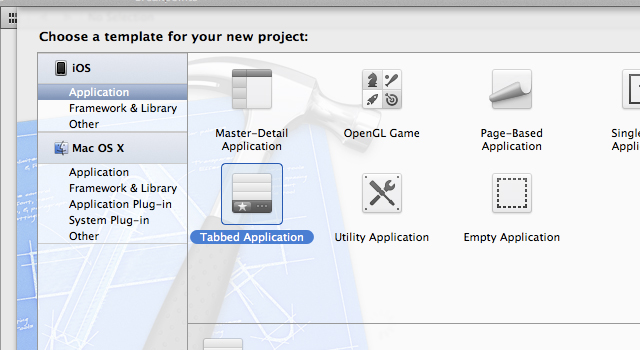
Click this and we’re presented with an options view. Each new project has a couple of setup screens to go through starting with the template. An “Empty Application” is the quickest way to start customizing from a bare-bones template. But for this tutorial let’s choose “Tabbed Application” so we have something to play with.
On the next menu we need to give the application a name. Standards dictate you should not use any spaces and follow the guidelines of capitalizing each letter of a new word. I’ll use the product name newSpeckyApp and additionally change the company identifier to com.speckyboy.
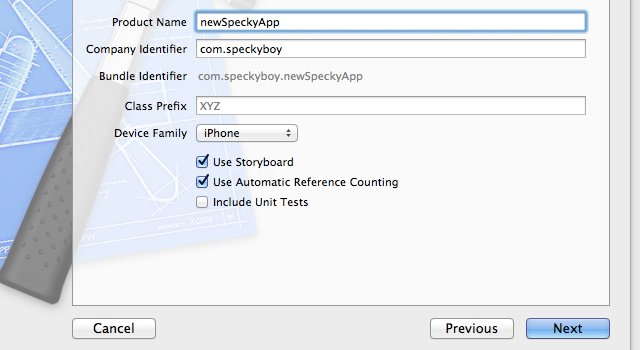
This identifier will not necessarily affect how your application runs. It only applies extra profile data so you can organize apps based on a company domain. Keep Device Family set to iPhone and make sure Storyboard and Automatic Reference Counting are checked. Hit next and select a directory to save the application source code.
Examining the Storyboard
Developers familiar with the older version of Xcode are expecting to work with .xib files. The old standard for iOS applications would create .xib files for each of the application views. The purpose of a Storyboard file is to consolidate all of these views together.
This not only makes editing your project a lot easier but it dramatically reduces the loading times within Xcode. The previous method of building views involved the Interface Builder software. However, this has been paired into Xcode so now you don’t even need it!
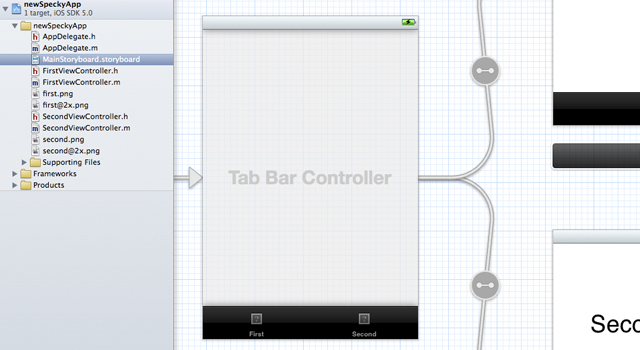
You’ll notice on this storyboard that we have 2 different views and a navigation item. The object on the far left is our tab bar controller which manages the navigation between only 2 pages(first view is loaded by default). You can edit the text on each page by double-clicking the elements. These are generic UITextView objects which control the display of text.
Running in iOS Simulator
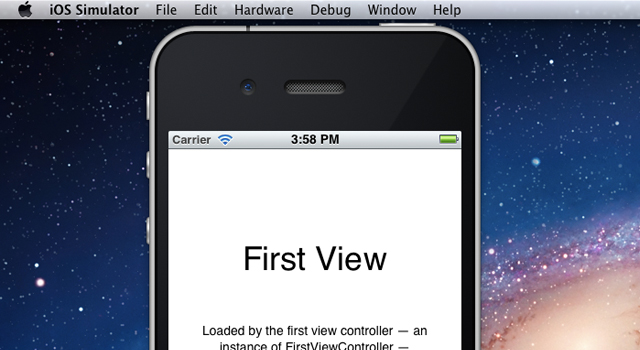
Before we tinker in more detailed areas let’s see how the generic tab bar application runs. Xcode includes another piece of software called iOS Simulator which behaves as a native iPhone right on your computer.
To build and run your application just click the circle button in the top left corner, or alternatively CMD+R as a shortcut. This pops open the simulator and you’ll catch a glimpse of the app loading into view. The only core functionality is clicking between both view pages on the bottom tab navigation. It’s not much, but it’s certainly a great template to start with.
If you click on the iPhone home button the simulator will return to your springboard. From here you’ll notice that your application comes bundled with a plain white icon. By default this is the standard icon for all iOS projects – and it’s very boring. Let’s look into the process of customizing your app with a new icon.
Design for Apple Specifications
When we talk about graphics for the iPhone it’s important to go over Apple’s set of rules. Especially when in the realm of application icons there are strict size limits you should adhere with.
The largest icon size you’ll need is 512×512 pixels which is only featured in the iTunes App Store profile. It’s a good idea to keep this size in mind if you ever plan on publishing into the App Store. But for just a practice demo app we can get by without this larger template.
Check out the list below for a more complete writeup. We only need to include the 57x57px icon sized for standard iPhone & iPod Touch displays. But it’s wise to consider all of the potential options:
- • 512×512 – iTunes Artwork
- • 57×57 – Standard iPhone/iPod Touch
- • 114×114 – Retina iPhone 4/4S
- • 72×72 – iPad
There are other iOS sizes used for lesser-important sections. These include the Settings view and spotlight search, as well as custom document types. I’ve written up a full list of sizes in a previous iOS design article. But for now I’ll just create a 57×57 square icon design with the Speckyboy logo.
Attaching an App Icon
I should also point out that all application icons should be saved as square .png files. The rounded corners and gloss effect are added once the app is compiled and running on an iPhone(or simulator).
First save and download the icon file I linked above. You’ll want to drag this from Finder into your Xcode project window. A menu comes up asking if you want to copy the file over, just click Finish and the png should appear in your project navigator on the left side. I move all my icon files into the Supporting Files group to make it easier to manage and much more organized.
Before this icon will appear we need to edit the application’s .plist file. This should be located inside the Supporting Files group in the format %AppName%-Info.plist. So in my case the file is named newSpeckyApp-Info.plist. Look down through the Keys list until you find the row labeled “Icon files”.
![]()
This will contain an array of file names which point to each of your app icons. The naming conventions are also fairly standard coming right from Apple. Icon.png is used for the regular iPhone while [email protected] is displayed on retina devices. Click to select this row and then click on the small arrow icon to the left. This expands the array open so we can see there are currently no values.
![]()
To change that click on the plus icon over to the right side. This adds a new array value with an empty String. Enter Icon.png for the value and save any changes. Now build and run the application to check out the effect! If the app launches too quickly just click the home button again to view the springboard of icons.
Helpful Resources
- • iOS Developer’s Roadmap
- • Apple Development Center for iOS
- • iPhone Dev SDK Forums
- • Programming Objective-C in XCode 4 – iPhone “Hello, World!” tutorial
Conclusion
This overview should get you comfortable with putting together a very basic iPhone application. We didn’t spend any time going into Objective-C since the programming can get intense for beginners. But I recommend skimming some light material on the topic to slowly break yourself into the language. Additionally if you have thoughts or questions on the article please share with us in the post discussion area below.
Related Topics
Top