Custom Fields are one of those features inside WordPress that not everyone is fully aware of. While they’ve been around for a while, they aren’t really screaming “use me” out of a standard install of WordPress. That said, they can really help you achieve some powerful and unique features in your projects.
Let’s explore one simple idea of how you can use WordPress custom fields to create an enhancement to the appearance of your site.
What You’ll Need
Before we start, make sure you install a copy of the Advanced Custom Fields plugin. While those proficient with PHP can create their own custom fields (or even use the more basic implementation that comes with WordPress), Advanced Custom Fields makes things a bit easier. It adds a familiar WYSIWYG interface and will even export the PHP for you under a separate Export entry in the plugin’s menu. If desired, you can then paste that code into your theme’s functions.php file. However, that isn’t completely necessary, as the custom fields you create will stay functional for as long as you keep the plugin active.
Let’s Create Some Fancy Page Titles
While there’s something to be said for simple text page titles, sometimes you might want something a little more interesting. For example, what if you wanted each page of your site to have its own page title background image, like this:
This has been designed to be a background image with a blue, semi-transparent box to hold the page’s title text. Here’s how to make it work:
Within Advanced Custom Fields

- Create a new custom field set and give it a name such as Page Header. Take note of the field name that Advanced Custom Fields creates –
page_headerin this case. - Select Image as your Field Type.
- Set the Return Value to Image URL. This will make it easier to display the image we upload on the front end of the site.
- Set Rules in the Location box to Post Type is equal to Page. You may also set this to a specific page, post type or category if you wish (adjust your code accordingly).
- In the Options box, set the position of your field to High (after title). This will ensure the custom field will be placed just below the title of your page inside WordPress.
- Save your field.
Of course, there are a lot of other options and field types you could explore. Take a look at the Advanced Custom Fields documentation for more information.
Inside the WordPress Editor
- After you have created your custom field, visit the page you wish to edit in the WordPress Dashboard.
- You’ll notice that the custom field we created is now towards the top of your page, just under the title:
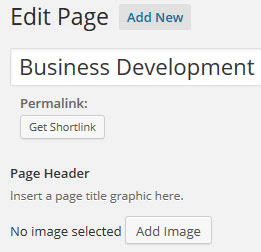
- From there, click on the Add Image button to upload your custom image. This will be familiar to you as it’s exactly the same process as using the Add Media feature in your pages and posts.
- Once your image is uploaded, you’ll see a preview of it. Make sure to save your page.
- You can repeat these steps for each page on your site that you would like to use a custom page title image.
In Your WordPress Template
- Find the page template you wish to edit in your theme/child theme. Since I’m going to add this field to every page in the site, I’m using
page.php. - Add code similar to this in place of your current page title area (you may need to do some digging if using a pre-built theme):
In Your Theme’s Stylesheet
- Paste the below CSS into your theme’s stylesheet:
 .custom-page-title {
 font-size:34px;
 line-height:40px;
 font-weight:normal;
 color:#FFF;
 height:150px;
 margin-top:10px;
 -moz-border-radius-topright: 75px;
 -webkit-border-top-right-radius: 75px;
 border-top-right-radius: 75px;
 -moz-border-radius-bottomright: 75px;
 -webkit-border-bottom-right-radius: 75px;
 border-bottom-right-radius: 75px;
}

 h1.custom-page-title span {
 position:absolute;
 background-image:url(images/page-title-background.png);
 width:240px;
 height:110px;
 padding:20px;
 }
Notice the use of in the style attribute of the H1 tag. This allows the custom page title images we uploaded to our pages to be used as a background image. Then, we created a box using a semi-transparent .png file which will hold the title’s text.
Of course, you can style this in any number of ways. Depending upon how you want to implement this custom field, you may also use conditional statements to create a default page title (fallback) image or even hide the field on specific pages.
So Many Possibilities
As with Custom Post Types, Custom Fields can help add some cool features to your site and even make it easier for your clients to update. Because there are so many different types of fields to use, you can customize virtually any type of content you want.
Take some time and play around with Advanced Custom Fields and see what you can create!
Top