With security continuing to be a primary concern for all involved, utilizing SSL on a WordPress website is becoming more common every day. In fact, according to Matt Mullenweg’s annual “State of the Word” address for 2017, the amount of WordPress sites using SSL has doubled to 36 percent compared to 2016.
This growth is due to the availability of free and inexpensive certificates and the fact that browsers such as Chrome and Firefox have begun calling out sites that aren’t running under HTTPS. Google has also factored the use of SSL into search results.
What all of this means is that SSL is no longer a must-have feature just for sites that focus on eCommerce. It’s quickly becoming the standard for virtually all types of websites.
Let’s discuss some of the benefits of using SSL with WordPress. Then, we’ll share some tips for implementing it on your own site.
Security for Users and Administrators
We know the benefits of SSL from a user’s perspective. Any information they share with your site via a form, shopping cart, etc., is encrypted – keeping it safe from prying eyes. But did you know that the very same principles apply to site administrators?
Running the WordPress admin in HTTPS is also of huge benefit. Think of all the sensitive information you routinely enter inside of WordPress. Your own login credentials, new user account information, order data, etc., is all in need of protection. Encrypting this data is essential for every WordPress website out there.
If you’re in need of a certificate and are on a tight budget, Let’s Encrypt is a good option. The only downside is that these free certificates need to be renewed every three months. If your host supports it, there may be an option for automatically renewing them. Otherwise, there are several options on the market for low-cost certificates that will do the job nicely for most situations.
Note that eCommerce sites may be better off with higher-level certificates that offer features like identity validation that let customers know you are who you say you are.
In short, there’s no reason not to invest a little time and money into an SSL certificate. Now, let’s look at ways to integrate it with a WordPress install.
HTTPS Your WordPress
We’ll assume you already have a SSL certificate installed on your server. In most cases, it’s quite simple to setup WordPress to utilize an https connection. To make it happen, we’ll have to do the following:
- Back up the site!
- Change the Site URL
- Ensure all internal links and attachments use https
- Run the WordPress admin in https
- Automatically forward http requests to https
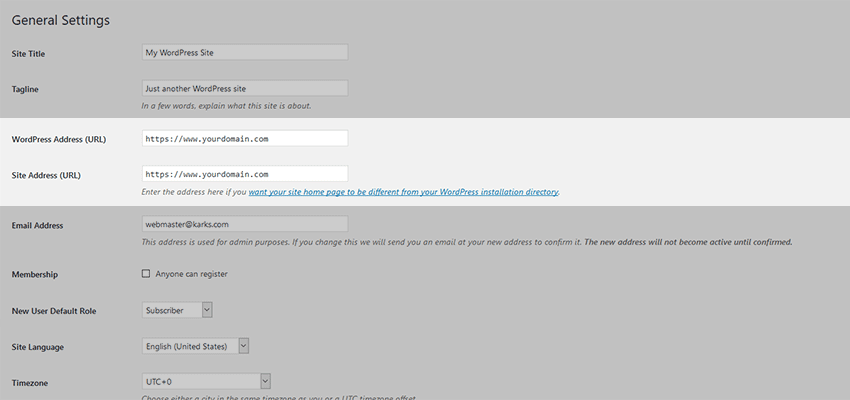
Change the Site URL
First, navigate over to Settings > General inside the WordPress administration area. You’ll want to change the WordPress Address (URL) and Site Address (URL) from ‘http://www.yourdomain.com’ to ‘https://www.yourdomain.com’.
Scroll down to the bottom and save the changes when you’re done. Once saved, this change will most likely log you out of WordPress. You can then log back in using the newly-secured URL.
Ensure All Internal Links/Attachments Use https
Changing the URL of your site does not guarantee that every link, image, or attachment URL throughout WordPress will switch to HTTPS. You can easily take care of this by doing a search and replace of your database. Before you do anything, please make sure to back up your site just in case anything should go wrong.
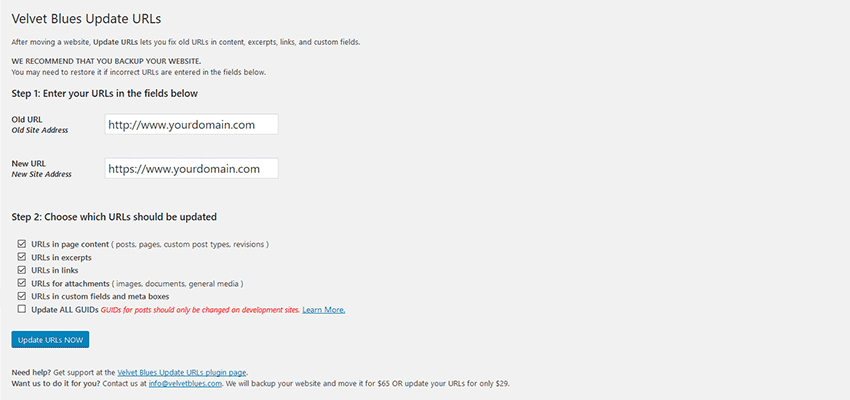
There are several search and replace plugins available for WordPress, but one easy solution is Velvet Blues Update URLs. What’s nice about this plugin is that it only touches the areas of the database that need to be changed. So there’s very little chance of changing the wrong thing. Once you’ve installed and activated the plugin, head over to Tools > Update URLs to get started.
Using the plugin is as simple as adding the old and new URLs for your site. Note that you should NOT check the box for “Update ALL GUIDs.” All other boxes can be checked based on your need.
Ensure that all the settings look correct, and click “Update URLs Now” when you’re ready. The plugin takes care of the rest. Once the URLs have been replaced, you’ll see a report on the screen of how many URLs were changed and where the plugin found them.
Run the WordPress Admin in https
To make sure that the WordPress back end always uses https, grab the latest version of your site’s wp-config.php file and add the following line just above “/* That's all, stop editing! Happy blogging. */”:
Save and upload the file to your server.
Automatically Forward http Requests to https
Finally, we’ll want to make sure that only https URLs are used for our site. Download the latest copy of your site’s .htaccess file and add the following just underneath the line “RewriteEngine On”:
Save and upload the file to your server. To test, try and enter an HTTP URL for your site in a browser. If everything is working properly, it should automatically forward you to the HTTPS version. Note that you may have to find other ways to make this work since every server is set up differently. If you run into trouble, contact your web host for suggestions.
Troubleshooting a ‘Broken’ Lock
If you’re finding that some or all pages throughout your site are producing a broken padlock icon in your browser’s address bar and/or mixed content warnings, that means something is trying to load in from an HTTP address.
Usually, the culprit is a script or other outside resource being called from your site’s theme or CSS. For example, an older site that imports Google Fonts may be doing so through an HTTP address. Look for anything that isn’t using HTTPS, edit it (you may even take ‘HTTP’ out completely and start the call to your resource using backslashes, i.e. ‘//www.resourcedomain.com/script.js’). Refresh the page and see if that clears up the issue.
If you are still having trouble, visit Why No Padlock? and enter the URL you want to analyze. The service will scan for unsecured resources and will list them for you. From there, you can make any necessary changes and re-test.
A Simple Way to a Safer Web
SSL has never been easier or more affordable to implement. The fact is that browsers and search engines are now (kind of) shaming sites that aren’t using HTTPS. That should prod us all towards using it. Besides the guilt trip, adding this extra layer of security is the right thing to do.
Consumers want to see that green padlock in their browser because it means that you take their private information seriously. That will make them more likely to buy something from you or even fill out a simple contact form.
On the modern web, there’s no longer an excuse for not using HTTPS. A few minutes of setup can mean big benefits for your site and its visitors.
Related Topics
Top